|
Stuff I Used
-
Electric fan, 16" diameter, aluminum
blades.
Perma-Cool part#19115.
Summit Racing part# PRM-19115
-
Thermostatic control unit, metal sensor
3/8" NPT, 185F on/ 170F off.
Painless Wiring part#30103. Special ordered from Summit Racing.
-
3/8" NPT tap. This was purchased at Ace
Hardware. Required a 37/64 hole. The drill bit was hard to find.
-
3M heat shrink tubing
-
Soldering iron & solder
-
18 gauge wire
-
New water outlet and thermostat gaskets
or gasket maker compound if you prefer.
-
Drill press - RECOMMENDED. Hand drilling
is risky.
|
  |
|
I first poured over all of the catalogs that I
had: Jeg's, Summit Racing, Sears, etc., for an electric fan that would move maximum air,
retain the stock fan diameter and had ALUMINUM blades. I found all in a unit manufactured
by Perma-Cool: 16"
aluminum blade diameter, 2950 CFM (unloaded) and a 9 amp draw. It mounts to the radiator
with 4 heavy plastic "zip" cords and foam pads.
|
Thermostat
The optimum thermostat is a 180F unit. Do not run anything cooler on an FI
Z car. Cooler operating temps will cause the electronics to compensate and
negatively affect the performance of your car. |
Coolant Temperature Sending Unit
USE ONLY A FACTORY NISSAN TEMPERATURE SENDING UNIT. The cost is approx $12
from Courtesy Nissan (800-527-1909). All aftermarket sending units I have
ever used have read too high and ended up failing shortly after installing
them. Aftermarket units WILL make you think your Z is running hot.
You can tell if your sending unit is stock by checking to see if it is a
one or two piece design. The stock sending unit is made up of two pieces:
a cylindrical sensor that is held into the lower thermostat housing with a
separate threaded collar. All aftermarket units that I have seen are one
piece. IF YOUR SENDING UNIT IS ONE PIECE - TRASH IT! |
Control Unit
Next was the thermostatic control unit. The
only units offered in my catalogs were those that had stick on temperature sending units
or probes that stick in the radiator fins or in the radiator hose. This would not do for
me. I wanted a metal sensor that would screw into the lower thermostat housing of the Z
where all of the other sensors are located. That way the fan would see the exact same
temps as my gauge and ECU. I went to work searching some of the Chevy related sites and
visited the website for Painless Wiring. They offer 2 wiring kits for electric fans that
include a temperature on/off switch. I chose the unit (Part# 30103) that is on at 185 F
and off at 170 F. The kit includes a relay, sensor, 30 amp circuit breaker, terminals,
wiring diagram and wire. It is a simple 4 wire installation and the guys at Painless lived
up to their name. |
|
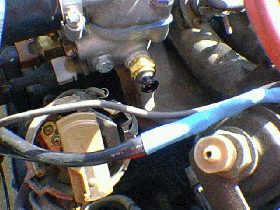
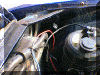
Sensor Placement - New Threads
 Drain the entire engine and radiator of coolant by removing
the
lower radiator hose. Remove the upper hose and then unbolt the lower thermostat housing
from the head. I found a u-joint attached to my ratchet most helpful at this point. Unbolt
the thermostat cover and remove the thermostat as well as all factory sensors so they
won't be damaged. Drain the entire engine and radiator of coolant by removing
the
lower radiator hose. Remove the upper hose and then unbolt the lower thermostat housing
from the head. I found a u-joint attached to my ratchet most helpful at this point. Unbolt
the thermostat cover and remove the thermostat as well as all factory sensors so they
won't be damaged.
|

|
Note: I used the lower thermostat housing off
of my spare engine to practice on and play around with. I found that there is an extra
hole for a sensor where the original sensors mount. It is not a good option because when
drilled and tapped it comes dangerously close to being one and the same with one of the
housing mounting bolt holes.I opted to use the outlet that supplies coolant to the heater
block just below the air regulator. This location has plenty of room for the new threads
and the housing sits level to help with drilling. There is plenty of clearance between the
sensor and distributor cap. If you opt to keep the small coolant lines the outlet will
screw into the previously plugged hole next to the original sensors
|
Clamp the housing down in the correct position
for drilling and drill out the 37/64 hole. I recommend using a drill press of some kind (I
used one that holds a hand drill) so that the hole is straight and smooth. I tried
drilling holes manually on the old housing and ended up with bad threads. Take your time
so that the hole is nice and uniform. Start the tap in straight and work it in slowly. Be
sure to back it out every one or two turns so the shavings will not ruin your new threads.
If the tap gets harder to turn take it all the way out and completely remove all of the
shavings. When I got done the sensor went in with only the help of a wrench on the last
few turns. Install all of the old sensors and the new fan switch sensor. I used Loctite
PST thread sealant on all sensors. It works much better than teflon pipe tape can.
Clean up the gasket surfaces, use some
Permatex silicone gasket to hold the new gaskets in place, drop in the thermostat and
re-install the thermostat housing as one unit.
|
|
Fan Installation
 Remove the fan shroud and the stock fan and fan clutch. Once this is done you
will see that it at least gives the appearance of more room under the hood. Unbolt the
radiator and remove it from the car.
Remove the fan shroud and the stock fan and fan clutch. Once this is done you
will see that it at least gives the appearance of more room under the hood. Unbolt the
radiator and remove it from the car.
|
|
|
Since I have AC I was forced to
remove the radiator to mount the fan. It may be possible for those without AC to
leave the radiator in the car
|
Place the radiator across a pair of sawhorses
or similar setup to allow easy access to both sides. Make sure that the engine side of the
radiator is facing up and place the fan in the correct location.
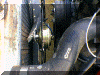 I placed the
fan to the left side of the radiator with the motor unit placed between the AC belt
tension pulley and the water pump pulley. The fan I purchased would not fit in the factory
location because of interference with the water pump pulley. Be sure to use the foam pads
to protect the radiator tubes and figure in their thickness when finding the right
location for mounting. MEASURE TWICE - ZIP MOUNT ONCE. I learned that the hard way and had
to locate a local shop with some of those zip cords because I had to cut the first pair
off. Summit Racing does offer those cords in a kit for about $6 and you may want to order
them just to have on hand. Pull the zip cords nice and snug against the radiator so that
the fan has nowhere to go. Re-install the radiator,
hoses and fill with coolant. Perma-cool recommends that the particular fan I purchased be
used without a shroud. I placed the
fan to the left side of the radiator with the motor unit placed between the AC belt
tension pulley and the water pump pulley. The fan I purchased would not fit in the factory
location because of interference with the water pump pulley. Be sure to use the foam pads
to protect the radiator tubes and figure in their thickness when finding the right
location for mounting. MEASURE TWICE - ZIP MOUNT ONCE. I learned that the hard way and had
to locate a local shop with some of those zip cords because I had to cut the first pair
off. Summit Racing does offer those cords in a kit for about $6 and you may want to order
them just to have on hand. Pull the zip cords nice and snug against the radiator so that
the fan has nowhere to go. Re-install the radiator,
hoses and fill with coolant. Perma-cool recommends that the particular fan I purchased be
used without a shroud.
|
|
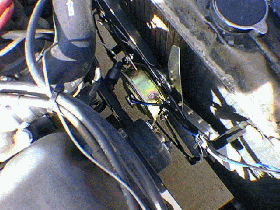
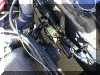
Relay and Wiring
 The
whole system is only a four wire hook-up; five if
you include the fan ground. I placed the relay next to the emissions canister as Painless
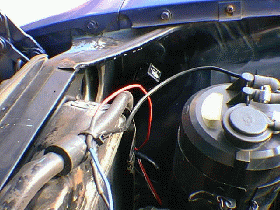
Wiring recommends it be mounted close to the radiator. I ran a power lead to the battery
and installed the supplied 30 amp circuit breaker on the fender between the battery and
the fusible link bracket. One lead went over the engine following the fuel lines to the
sensor, another around the back of the engine compartment to the + lead of the ignition
coil and the last lead to the fan itself. I grounded the fan to the nearest strut tower.
The ignition must be on and the sensor switched on for the unit to operate. I plan on wiring another relay and switch into the system for a manual override
in case the sensor goes bad or the gauge gets a little too high for comfort. The
whole system is only a four wire hook-up; five if
you include the fan ground. I placed the relay next to the emissions canister as Painless
Wiring recommends it be mounted close to the radiator. I ran a power lead to the battery
and installed the supplied 30 amp circuit breaker on the fender between the battery and
the fusible link bracket. One lead went over the engine following the fuel lines to the
sensor, another around the back of the engine compartment to the + lead of the ignition
coil and the last lead to the fan itself. I grounded the fan to the nearest strut tower.
The ignition must be on and the sensor switched on for the unit to operate. I plan on wiring another relay and switch into the system for a manual override
in case the sensor goes bad or the gauge gets a little too high for comfort.
|
|
RESULTS
This install has proven to
be very road worthy. The Alabama summers do not affect my Z at all. AC is
not a problem. The gauge in the car never gets past 200F and that is only
at idle. If the car is moving at more than 35mph the fan NEVER runs. The Z
cooling system is very efficient when airflow through the radiator is
present. At idle, the fan cools fine and the gauge will noticeably measure
a decrease in temperature when the fan cuts on.
The Z temperature gauge should read in the middle of the gauge to be at
proper operating temperature. If it does not you should check your sending
unit or your Z is, of course, running hot.
I am very confident that this
conversion, if followed step by step, will adequately cool any stock Z car
if the cooling system is in good order. |